Table of Contents
Preparing Food without Electricity Video: How to make a 16 brick rocket stove
Solar Cooker: Varieties and Styles
Solar Cooking Tips
Build a Simple Solar Cooker for less than $5
Instructions for Building a Solar Box Cooker
Build a Solar Cooker
Proper Installation, Operation and Maintenance of a Wood Stove
|
Preparing Food without Electricity by Preparing for the Coming Collapse of the US Dollar on Thursday, September 22, 2011 at 9:53am
The last article was about preserving food without electricity, it's not easy but it is possible. This one is a little more difficult, and is made up of some common sense solutions and some unorthodox solutions to preparing your food when you can't use the stove, oven or microwave. I put this story in another article, (don't remember which one) about preparing for the coming Hurricane Charley. We were in Wal-Mart getting some camping type gear and food when the lady in front of us proudly placed her emergency essential can opener on the belt so that she could open cans of food when the power went out. Did I mention the can opener was an electric can opener? Well it was. There are times in life that it is very difficult not to laugh out loud at a person's stupidity, this was one of them. Preparation is about more than just the right idea, it's about the right idea and focus.
Anyway, here we go.
Common Sense solutions 1. Grills - Whether charcoal or gas, (gas is cheating) a grill can be used to boil water, cook meats and veggies and all sorts of good things to eat. If you can get one of those charcoal starters that uses a single piece of paper to light charcoal or wood chips, get it. There will be a time that you will run out of starter fluid. This brings up another "Con" to the grill idea. You need fuel, charcoal, wood, a copy of "Dreams from My Father" and "The Audacity of Hope", (use caution though cause they can leave a bad aftertaste in your mouth.) One more "Con", the smoke and scents released sends up a clear signal to everyone within a mile or so that YOU have FOOD.
Answer to Con 1: It is not extremely difficult to make your own charcoal. All you need is some scrap wood or agriculture waste (corn stalks, etc) a grill and about one box of corn starch. Remove the grates from all sections of your grill, if you have a small grill, you may want to use a 55 gallon steel drum. Plug all the ventilation holes in your grill from the drip pan hole to the vents on the top and side. Jam it full of dry waste, then ag waste then wood scraps. Light the dry waste and let it burn until there is a fire going under each section of waste and wood. Close the lid and vents to shut off the oxygen supply that feeds the fire. The continued heat will carbonize the waste and wood into chunks of charcoal and carbon. Grind the carbon until you are left with a fine powder. Mix the powder with small amounts of water and corn starch. Press the "Mud" into a form or flat cookie shape and let dry for two weeks. Wallah, you have charcoal.
Answer to Con 2: Grilling inside is NOT an option. Carbon monoxide is released when charcoal is burned. About the only options you have to cover the smoke is to redirect it, cook at night when it's less visible, or use gas. Covering the scent is going to be more difficult if not impossible. A large mound of Black Kow fertilizer may discourage strangers from sniffing intently.
2. Smokers - (see grills)
Unorthodox Methods
1. Sun Oven - Boy Scouts build their own versions of Sun Ovens for special projects but Food Storage Made Easy (awesome FB page) had a videos on their site of testing a commercially made, portable sun oven for less than $200. Whether you are making bread, roast or whatever, the Sun Oven they recommended can do it. Pros: No smoke, it's portable, it's affordable. Cons: Well it's not called a Sun and Moon Oven, so you can only cook where there is daylight.
2. Parabolic Mirror - For about $40 you can purchase a parabolic mirror from a science supply store. It also, like the Sun Oven, uses the power of the sun to cook food. Set up the mirror on a tripod where you can adjust the angle and place a grid over the mirror. Pros: Heats up fast, portable, affordable. Cons: Again, daytime cooking only and the sturdiness relies on your handyman skills.
3. Pepsi Burner - cut one soda can about one inch and a half up from the bottom of the can. Insert another soda can into this open area to stretch out the sides. Cut this second can in the same way you did the first. Place the second can bottom side up into the first. Press them together firmly. Use a hammer and a small nail to punch out four holes in the center indentation of the top can. Punch 16 more holes around the edge of the top can, try to be as evenly spaced as possible. Pour two tablespoons denatured alcohol, rubbing alcohol, (unscented) into the holes in the center of the can and let it drain into the can's interior. Light the center of the top can with a match. This burner can be reused until the aluminum weakens. Two tablespoons is enough to get a couple of cups of water to boil.
4. Don't have a sun oven or parabolic mirror? Need to reheat some already cooked meats or MRE's without the heater? Roll up your car windows and set a frying pan on the dashboard. On a hot day eggs will cook over easy and cheese sandwiches will melt.
5. Battery power - no I am not recommending you try to plug in your 220 volt oven into a battery bank. Take a set of jumper cables, two thin copper wires, insert wires into hamburger, hotdog or whatever and connect positive charge cable to one wire and negative charge wire to the other and watch electricity cook your food for you. Con: Severe drain on battery, but it will work in a pinch.
No matter what the emergency or how hungry you or your family is do not eat chicken or pork that hasn't been completely cooked. You don't want a medical emergency when the SHTF. Have plenty of camp stoves, emergency stoves and refills on fluid ready. These you can buy cheaply after hurricane season in many local grocery chains and at WalMarts. Solar Cooker: Varieties and Styles http://www.solarcooker-at-cantinawest.com/solarcookers-types.html Shared by Teri Hanna
In reality there are endless varieties and countless styles of solar cookers that have been made, and are continually being modified around the world.For our purposes though we will use the three main styles (classes) that are in use today. These would be the Box Cooker, Panel Cooker and Parabolic Cooker (concentrator)
In the past most were fabricated or constructed by individuals using readily available materials that were usually acquired at home or the local hardware store. But because of the growing awareness of the feasibility of using solar energy for cooking, and the increased world wide use of solar cookers, some organizations and businesses have begun to manufacture a variety of solar cookers, in the various styles and classifications, for sale on the commercial market and also for charitable donation toward humanitarian related efforts in economic, climate and war ravaged areas of the world.
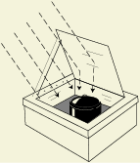
The most common and popular variety is probably the box cooker.Its design is based on the concept of a traditional modern oven where the food is placed inside of an insulated box for purposes of retaining or trapping the solar rays that have been converted to heat energy. (In order for the solar rays to covert to heat energy they must be able to reach the cooking utensil (pot, pan) usually passing through a transparent covering (glass, plastic) on the box cooker. The solar UV rays are then converted to longer infrared rays that heat the pot and food. The longer UV rays are not able to pass back out through the glass (transparent) covering and are thus retained inside the box enclosure, creating a buildup of heat;raising the temperature inside to sustainable cooking levels and thus causing the food to cook.) A box cooker can be made out of any type of material such as; wood, plastic, cardboard etc.Usually two boxes of varying size are needed in order to be able to fit the smaller one inside of the larger one, thus creating a gap or space around the smaller box which can then be filled with paper, hay, fiberglass etc. to form an insulating barrier between the two boxes to prevent the escape of heat through conduction.Manufactured boxes are designed and built with the gap and insulation ready made. Finally a transparent cover on top of the box is needed to permit solar rays to enter the box and at the same time prevent the escape of the (UV) rays that have now become solar energy (heat).The transparent cover can be created by using plastic sheets, glass sheets (preferably tempered so as not to break) or by using oven cooking bags. Reflector panels are usually added for purposes of concentrating the suns rays toward the cooking pot and food for higher cooking temperatures and effectiveness. These cookers can typically reach temperatures of 300° F (150° C) which is plenty hot to cook any food you would like.Food containing larger quantities of moisture cannot get much hotter than 212° F (100° C) so it is not necessary to cook at higher temperatures. Figure 2 Solar Box Cookers
The panel cooker usually consists of a cooking vessel (pot or pan) which is usually darkened or blackened, an oven cooking bag or transparent glass bowl along with a reflective panel. These panels can be made from aluminum foil over corrugated carton, or from tin or sheet metal panels polished to a high sheen and also with mirrors. The oven bag or glass bowl allows the suns UV rays to penetrate towards the food in turn trapping the energy; (heat) preventing its escape. The reflector panels concentrate the sun light onto the cooking vessel containing the food, in the same way the panels do so on the solar box cookers.A panel cooker is usually simpler and more economical to build and results in the same cooking effectiveness for most all situations.Some panel cookers can achieve relatively high temperatures depending on the pot and the food being cooked.Since most foods cooked in these types of cookers usually contain more moisture (soups, stews, meats etc.) they will usually cook around 225-250° F; similar to a slow, or crock cooker. Figure 3: Panel cooker with glass bowl and pot
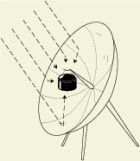
Often Known as, and called concentrator cookers, these are usually a bit more complicated to construct due to the design and necessary materials, but still are quite common in some areas of the world. The parabolic cooker can reach high temperatures more quickly, therefore cooking is accomplished more rapidly, though more frequent adjustment of the concentrator is needed for maximum effectiveness. Solar Parabolic Trough Cooker
Figure 4 Parabolic cookers in South Asia
Solar Cooking Tips: How to Become Proficient http://www.solarcooker-at-cantinawest.com/solarcookingtips.html Shared by Teri Hanna
Time constraints will be determined by time of day for most effective cooking and also hours available to the cook. The most ideal time of the day for cooking in a solar cooker is between the hours of 10:00 AM and 4:00 PM, this being possible in the summer time when the sun is directly overhead for a longer period of the day.In the middle of Winter your "ideal" time will be reduced to between roughly 11:30 to 2:30 PM. (In the middle of the summer I have started my cooking as early as 8:30 AM and have gone to 6:30 PM and was able to cook several dishes in one day in only one cooker.I do now have more than one solar cooker in my collection, which enables me to cook even larger quantities.) From mid fall on through to mid spring, ideal cooking time is reduced as the sun continues to fall further into the southern horizon here in the United States.Ideal times would be more along the lines of 11:00 AM, and later, to about 3:00 PM, or earlier.This does not mean that you need to put the cooker away for the winter; it just means a little bit more ingenuity is required to take advantage of the cooking time available. Granted, some people will have more challenges cooking because of home and work schedules, and that is fine, and you shouldn't replace the kitchen stove due to your new found source of harnessing the sun's energy. Look at the available opportunities you do have for solar cooking as unique periods of learning, experiment and enjoyment.The time will come when you will find further opportunities to use your solar cooker more and more often. Then, there are those who have challenges with the weather itself. Within some areas of the United States there are those who enjoy a whole lot more sunny days than other areas, and some areas of the world are better than others, but this does not mean that a person in England or Seattle cannot enjoy the benefits and joys of solar cooking.In fact, within these same places and others similar in weather; there are quite a few people who have been solar cooking for many years and doing very well with it. They just might not be able to do it as often as someone living in Phoenix Arizona or the Sudan in Africa. Now, more on the matter of efficiency while using a solar cooker.

When used properly; a solar cooker can safely cook all kinds of food. Extra care should be taken when cooking meats and legumes to assure that temperatures do not fall within the danger zone for creating harmful microbes such as bacteria or viruses.These harmful microbes can be killed when the food is heated to 65° C or 150° F, this is called pasteurization.When the food is heated to 82° C or 180° F or above it will begin to cook.After food is cooked it should be eaten as soon as possible after doing so, do not allow food to sit at room temperature for more than two to three hours
Build a Simple Solar Cooker for less than $5.00 http://www.solarcooker-at-cantinawest.com/build_a_simple_solar_cooker.html Shared By Teri Hanna
The materials necessary for building your own individual solar panel cooker can be purchased at your local home improvement store such as Home Depot, Lowes or Ace, as well as oven bags and canning jars at your local grocery store or Walmart. Following is a list of the materials
Tools
The reflective bubble insulation can be purchased in a roll, (25'x 2') allowing you to make several reflective panels, or you can buy a pre-cut length in some home improvement stores. This particular reflector panel is a 3'x 2' (three by two foot) panel.
Take hold of both remaining twelve inch flaps and draw them inward, toward each other to form a "floor" or "base" which will rest on the ground, enabling the reflective panels to stand up on their own.
You can cook most anything you like inside of the jar, or you may use a larger darkened or black cooking pot inside of your oven bag in order to increase the amount of food to be cooked. For most efficient heating of your cooking vessel (pot or jar) you can place the jar on a trivet, inside of the oven bag, allowing the suns rays and the hot air to circulate beneath and around the vessel.
To build a simple solar cooker with more potency all you need to do is increase the size of the panel reflectors, enabling the cooker to capture more of the suns ray and concentrating them onto the oven bag and cooking vessel. For example you might cut a four to five foot section of reflective bubble material and measure equal distance from the sides, cutting your flaps and folding into a larger, more effective "sun catcher". Like wise you can increase the height of the panels, making it that much more effective. Instructions for Building a Solar Box Cooker http://www.tamaradwyer.com/solcook/instruct.html Shared by Teri Hanna
Read the instructions in the previous section, Supplies and Equipment, for information about the materials. After all the supplies are gathered, the first step in constructing the solar box cooker is cutting the cardboard and foil-backed foam board insulation into the correct sizes. Once the cardboard and foil-backed foam board insulation are cut into the correct sizes, the actual construction begins. The box knife is used to score the cardboard to make neat folds. Elmer’s glue adheres the foil to the cardboard. Aluminum foil tape holds all the pieces together.
The instructions cover constructing the three-part inner box, which is insulated to trap the heat used for cooking. The reflector, four pieces of sturdy cardboard covered with foil, is constructed next. The last stage is to use the outer box and bungee cords to hold the reflector and inner box together. Use Figure 6, a diagram of the complete solar oven, to help identify the parts.
The instructions are broken down into the following sections: Build a solar cooker http://solarcooking.wikia.com/wiki/Category:Solar_cooker_plans Shared by Teri Hanna
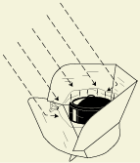
 Added by Tom Sponheim Added by Tom SponheimThere is a wide variety of solar cooker designs, many of them very simple to build from inexpensive, easy-to-obtain materials. Some can be built in as little as an hour for less than US$5. Start by choosing a cooker design type based on your requirements. The table below lists strengths and weaknesses of the most common types, and shows some popular cookers of each type. Below each table are all cooker plans of that cooker type. You can also buy a solar cooker from a variety of companies.
Selected designs
|
|||||||||||||||||||||||||||||||||||||||||||||||||||||||||||||||||||||||||||||||||||||||||||||||||||
 What is your favorite Solar Cooker?


 It really is not difficult to master the skill or art of solar cooking.Many of the same skills that you use for traditional cooking methods will serve just fine when applied to solar cooking.The two biggest factors that will have much bearing on your cooking effectiveness will probably be time constraints (including weather) and efficiency in preparing and putting your ingredients together.
 Even when cooking by conventional means, much time and effort is saved when you cut down on time consuming steps and unnecessary running around when preparing your meals.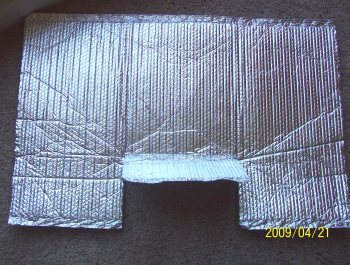
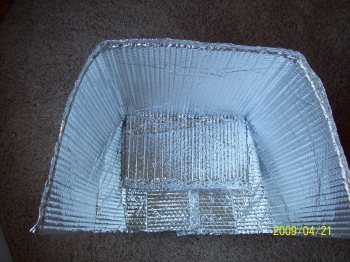 Clip all three joined flaps with a large paper clip, assuring the flaps remain together.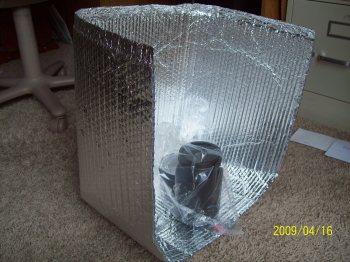


| Advantages | Disadvantages | |
| General characteristics |
|
|
 |
|
|
Windshield Shade  |
|
|
Cookit  |
|
|
Sunny Cooker  |
|
|
See all Panel cooker plans.
Box-style cookers Edit
Edit
| Advantages | Disadvantages | |
| General characteristics |
|
|
The "Minimum"  |
|
|
Easy Lid 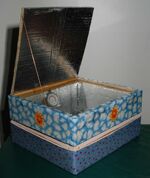 |
|
|
Heaven's Flame  |
|
|
See all Box cooker plans.
Parabolic cookersEdit
| Advantages | Disadvantages | |
| General characteristics |
|
|
DATS  |
|
|
Proper Installation, Operation and Maintenance of a Wood Stove
Lloyd R. Walker
Colorado State University Cooperative Extension
Quick Facts
|
Many homeowners concerned about rising home heating costs purchase wood stoves to reduce heating bills. Adding a wood stove to a house must be undertaken properly to ensure a safe installation. A wood stove is unlike any other device presently in a modern home.
A wood stove regularly has surface temperatures over 400 degrees F. The interior stove temperatures are over 1,000 degrees F, and if a chimney fire occurs, temperatures over 2,000 degrees F are possible. Obviously, a device that can achieve such high temperatures must be treated with respect, and installed, operated and maintained properly to ensure the device does not pose any hazard in the home.
Installation| Table 1. Minimum clearances from combustible walls and ceilings. | |||
| Stove type | |||
| Type of protection | Radiant | Circulating | Stovepipe |
| None | 36" | 12" | 18" |
| 1/4" Noncombustible board spaced out 1" | 18" | 6" | 12" |
| 28 gauge sheet metal, spaced out 1" | 12" | 4" | 9" |
| 28 gauge sheet metal on 1/8" noncombustible board, spaced out 1" | 12" | 4" | 9" |
Once a location for a stove is established, prepare the area properly to ensure there is adequate clearance from any combustible surfaces. Combustible surfaces include floors, furniture, and walls of plaster, drywall or paneling. The proper distance from these combustible surfaces is determined by consulting three sources. If the stove is "listed," which means it was safety tested by an independent testing lab, there will be manufacturer's recommendations for clearance from combustibles.
If a stove is not listed, follow the National Fire Protection Association recommendations (see Table 1) for clearance from combustibles. However, either of these recommendations are superseded by local building codes. Check with the local building inspector to find out what clearance standards are enforced in your area.
From Table 1, the distance to unprotected surfaces, especially for radiant stoves, is quite large--36 inches. Thus, most stove installations have some type of non-combustible wall protection behind the stove to allow for installation closer to the wall without presenting a safety hazard (see Figure 1). Asbestos millboard, while it is an acceptable type of protection, is not recommended because of the health hazard from asbestos fibers. If asbestos is used, paint with a high temperature enamel o lock in the fibers.
 A most important item in wall protection is the 1-inch spacing necessary between the protecting material and the wall. The 1-inch spacing is necessary to ensure air circulation between the protection and the wall so that the wall is not subject to high temperatures. The spacers used to attach the sheet metal to the wall also must be non-combustible. (Do not use wood furring strips.)
Another method to achieve the same type of protection is using brick or masonry with a 1-inch air space between the brick or masonry and the wall. However, the weight of such a wall may cause structural problems in the house. Protection on the wall behind the stove must extend far enough on either side of the stove so that the distance measured from the stove body to the combustible part of the wall is at least 36 inches.
Floor protection is the other critical area to considered with stove installation. The National Fire Protection Association's recommendation for extent and type of protection of combustible floors under stoves are given in Table 2. If the stove is listed, install it according to the manufacturer's instructions. Check local building codes for specifics regarding type of floor protection and acceptable clearances. Cover floor protection materials with noncombustible materials such as brick, stone or tile to improve appearance.
 With the stove properly installed, connect the stove to the chimney. For this connection, use a heavy gauge stove pipe--generally 24 gauge for most installations--and follow manufacturer's recommendations. The connecting stove pipe must be as short as possible. Secure all joints with sheet metal screws and connect the pipe with the crimped end pointing downward to contain creosote (see Figure 2). It is important to observe the 18-inch clearance from combustible surfaces. To reduce clearances, dd wall protection using the same materials and techniques recommended for the stove installation (see Table 1).
Choose the type of chimney with safety in mind. A masonry chimney is acceptable but may be expensive and difficult to build. An existing fireplace chimney can be used for a wood stove. The simplest type of chimney to add to a house is a factory-built metal chimney (see Figure 3). When choosing a factory-built chimney, choose a chimney that is listed (tested by an independent lab).
The innermost lining of the chimney should be stainless steel to withstand high temperatures and corrosive environment. Install only a class A, all-fuel, or solid-fuel chimney for a wood stove installation.
There are three common types of listed factory-built metal chimneys; all are equally safe when installed in accordance with instructions and properly maintained. The three types are: 1) the air cooled thermo-syphon chimney, 2) solid pack insulated chimney and, 3) air insulated chimney.
Wood stoves function more efficiently with less maintenance problems when using a solid pack or air insulated chimney. The thermo-syphon chimney is designed principally for use with fireplaces and can present problems in wood stove operation due to the cool temperatures maintained on the innermost lining, which will accelerate creosote formation and require more frequent cleaning.


Any chimney must have adequate capacity, correct height, proper location, proper clearance from combustibles and proper mechanical support to be a safe installation. The diameter of the chimney must meet manufacturer's recommendations to provide adequate capacity for the stove. The chimney must be high enough to ensure efficient functioning of the stove (see Figure 4).
The most desirable location for a chimney is in the center of the house where most of the chimney is inside of the building. By exposing a minimum amount of chimney to the outside, creosote problems are minimized. A chimney located primarily on the outside of the house operates with cooler surface temperatures and tends to have creosote deposits more frequently and requires more periodic maintenance. A safe chimney installation requires at least a 2-inch minimum clearance from combustibles. A chimney that projects more than 4 feet above the roof should have some kind of mechanical support by wires, brackets, etc., to ensure that it will not be damaged by high winds.
If an old and long-unused masonry chimney is brought back into service for use with a wood stove, carefully inspect it to ensure that it is still safe to operate. If it does not have a tile lining, add stainless steel stovepipe the entire length of the chimney. Check with the building inspector or fire department for inspection of such an installation.
Once the stove is installed but before it is used, a local building inspector or fire department representative should inspect the installation. It is important to notify your insurance company about the installation to be sure your homeowner's policy will cover a wood stove installation.
There are several safety recommendations to follow after installing a wood stove:
- install a 10-pound ABC fire extinguisher, and a smoke detector in the home.
- familiarize house occupants with fire evacuation procedures. Adding a wood stove to a home will change the fire evacuation routes and these must be well understood by all occupants.
- Regularly inspect the entire installation. Inspect it carefully and frequently during the first few months of operation to be sure that everything operates properly and familiarize yourself with its operating and maintenance characteristics.
- Clean the chimney at least once a year.
It is extremely important to follow all of the installation procedures outlined in this fact sheet when installing a wood stove. The most efficient wood stove is not going to save any money if the end result is a house fire. Since the wood stove is a potentially dangerous device, treat it with respect and show proper adherence to installation procedures.
OperationWhen an efficient, airtight stove is selected and installed with a proper chimney, the efficiency and safety of the stove operation largely depends on the skill of the operator. The first consideration in operating a stove efficiently is properly preparing the wood for use in the stove. Thoroughly air dry the wood to ensure a moisture content of about 20 percent so that the maximum amount of energy is extracted from the wood.
Green wood does not burn well and the amount of energy available in green wood is 60 percent less than the amount of energy available in dry wood. Season green wood at least six months. Protect the wood from rain or snow with a cover so it does not absorb moisture.
The type of wood used also affects stove operation. Regulate stove operation by the size and type of wood used. Use hardwood (which is not in abundance in Colorado, the only exception being gambel oak), if available, for overnight burns since its higher density provides a longer duration burn. Use small split wood for fire starting and quick heating, often needed in the morning. Use larger round or split pieces when the stove is regularly attended.
Proper operation of a stove improves efficiency and reduces creosote problems. A small hot fire is the most efficient way to burn wood. Add small amounts of wood at a time to the stove and operate the draft controls in at least a half-open position. However, with overnight burns, load the firebox with wood and restrict the draft for a long duration burn. This type of burn produces more creosote. When loading the firebox for an overnight burn, set the draft controls wide open for the first 20 minutes to establish a hot fire and restrict the draft.
When firing the stove upon awakening in the morning, open the draft wide open with a small hot fire to help dissipate creosote that may have developed from the overnight burn. Make every attempt to operate the stove using a small hot fire whenever it is regularly attended.
The use of a chimney temperature gauge helps assess the operating mode of the stove. This device shows temperature of the burning gases exiting the stove. Install in the chimney connector approximately 3 feet from the exit of the stove. It can be a useful device to help monitor the operation of the stove and retard the production of creosote.
When using a wood stove, be sensitive to the operating characteristics. Regulate the amount of wood and the amount of air provided to the stove to achieve comfort levels in the house. Since a stove does not respond automatically, anticipate its performance in order to have uniform heat production.
An essential part of operational procedures is to know what to do in an emergency situation caused by a chimney fire. A chimney fire occurs when buildup of creosote in the chimney is ignited and burns quickly and hot. A chimney fire is not difficult to detect. It involves flames and sparks shooting out the top of the chimney, a roaring sound similar to a jet engine, the stovepipe glowing red hot and vibration or throbbing of the stovepipe. It generally has a short duration but is intensely hot and has the potential to do serious damage to the chimney and, in some cases, extreme damage to the house.
The best reaction to a chimney fire is to shut off the oxygen to the stove, alert occupants in the house, call the fire department, and make careful observation of the chimney, attic and outside of the house for fire. When a chimney fire is extinguished, carefully inspect the chimney for damage. Inspect the area around the chimney for any smoldering fires that may have started due to the intense heat, and before using the stove again be sure that nothing is damaged that would compromise the safety of the chimney. A chimney fire can be avoided with periodic chimney cleaning and avoiding extremely hot fires (which can occur when burning trash, Christmas wrapping paper, etc.). When a stove begins to glow, it is usually the result of being over-fired. This can damage the stove and has potential to start a chimney fire.
MaintenanceUse of a wood stove requires regular attention to a few maintenance procedures--proper cleaning of the chimney to remove creosote deposits, and regular inspection of the installation and handling of ashes. Creosote is an inevitable by-product of burning wood. Periodically clean out the deposits formed on the chimney walls to ensure good performance of the stove and reduce any safety hazards created by the creosote deposits. Clean chimneys at least once a year. A more specific rule to follow is to clean the chimney whenever there is a 1/4 inch or more creosote buildup on the chimney walls. Chimneys can be cleaned by a homeowner, using a stiff wire brush designed for the purpose, or by a professional chimney sweep. Cleaning a chimney can be a messy task because of the creosote deposits that are scraped out of the chimney. Take care to prevent dust and creosote from settling in the house. Wear a face mask when cleaning a chimney to avoid inhaling the creosote particles.
Check the stove installation at least once a year to be sure that there is no hazard created by the stove and that clearances from combustible surfaces are maintained. It is important to check the stove pipe used in the chimney connection. Stove pipe is subjected to high temperatures and will corrode in time. It must be checked periodically and replaced when it appears to be corroding beyond safe limits.
Dispose of ash properly. Carry ashes out in a non-combustible container such as a metal bucket, and do not leave them in contact with combustible surfaces. Charcoal buried in ash may smoulder for days. When placed into an improper container such as a cardboard box, it can easily cause a disastrous house fire. Dispose of ash immediately after cleaning the stove by spreading it on flower beds, gardens or compost piles.
| Table 2. Floor protection for stove installations. | |
| Height of stove bottom from floor | Protection needed |
| 18 inches or more | 24 gauge layer of sheet metal |
| 6 to 18 inches | 24 gauge layer of sheet metal over 1/4-inch layer of non-combustible board |
| 6 inches or less | 4 inches of hollow masonry laid to provide air circulation through the masonry layer covered by a sheet of 24-gauge sheet metal |
| Extent of protection is: 18 inches beyond any side with a firebox opening (door) 12 inches beyond all sides with no openings | |

